Getting started with Oracle SOA Cloud Service Part 2: Configure Oracle Database Cloud Service Instance
In this Post we cover the steps to setup the Oracle Database cloud service instance.
The Oracle Database Cloud Service instance is like any normal Oracle Database instance that is accessible and managed over a cloud.
Note: For Oracle SOA cloud service we need to create an Oracle Database Cloud Service with both Cloud Storage and Local Storage backup configuration
Follow the below steps to Configure Oracle Database Cloud Service Instance:
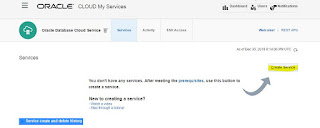
1. Log in to your Trial My Services Account
2. From Menu on Left Side, click on Oracle Database Cloud Service
3. Click on Create Service Button
4. It will ask to either upload the SSH key or generate the new Key. Make sure you save the SSH key as it is needed to connect later.

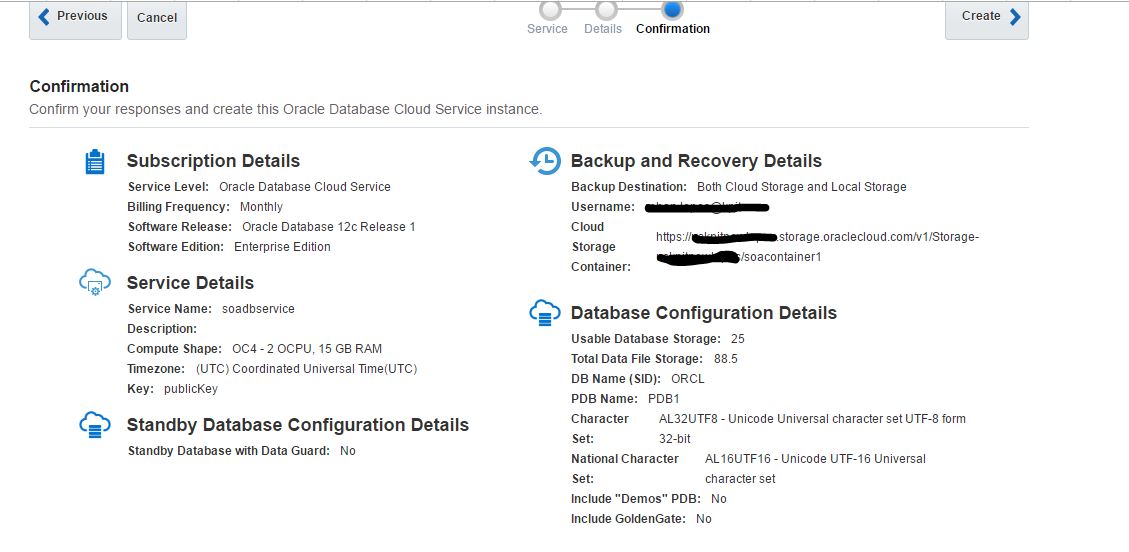
5. Next, enter the service name, select the Software Release Version and click Next

6. Next, Select the Compute Shape i.e. how many CPU's and RAM is needed.
Since this is a trial I selected 2 CPU with 15GB RAM, which I feel is more than enough.
Make you select "Both Cloud Storage and Local Storage" Option.
Here in the container details, we need to provide the container service URL, user/password, which we covered in PART 1.
If the container does not exist, you can check Create Cloud Storage Container Check Box

7. Review the configuration details, if everything is OK, click on Create Button.

8. It take about 15- 20 mins to create the Database Instance. Till then you will see the status as In progress.

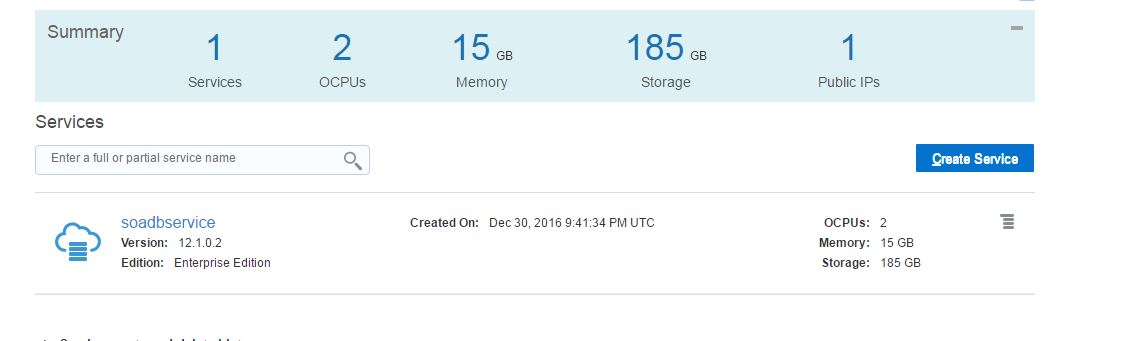
Once the Service is created, you will see the status as completed. Also the action button is enable for the instance.

Next, we will see how to connect to this Oracle Database Cloud Instance over a public network:
In Order to access the Database Instance over a public network we need to enable the Access Rule.
1. Identify the Public IP address for our Oracle Database Cloud Instance. To do this, just click on the instance and IP will be visible in Details Section
2. Click on Action Button, and Click on Access Rules

3. Enable the ora_p2_dblistener access rule

4. As the access rule is now enabled, lets connect to the Cloud Database from Local JDeveloper.
Open the JDeveloper, Click on Add Connections under database window
Provide the required details i.e. User/Password that was enter while creating the Database Instance.
Public IP as a Hostname
SID/Port

5. If everything is proper, you will see the success message.
Now you can query the database like any other private database in the network.

The Action button provide options to access EM console/DBaas monitor etc, which can be used by the DBA to maintain and manage the DB instances.

Overall, I am pretty impressed with the Oracle Cloud Offering, if you see in this post, I as non-DBA, was able to set up the Database Instance in less than 1 hour with just clicks.
Next in Part 3, We will explore the steps to Configure Oracle SOA Cloud Service Instance using this DB Instance.
Ref:
http://docs.oracle.com/en/database/
The Oracle Database Cloud Service instance is like any normal Oracle Database instance that is accessible and managed over a cloud.
Note: For Oracle SOA cloud service we need to create an Oracle Database Cloud Service with both Cloud Storage and Local Storage backup configuration
Follow the below steps to Configure Oracle Database Cloud Service Instance:
1. Log in to your Trial My Services Account
2. From Menu on Left Side, click on Oracle Database Cloud Service
3. Click on Create Service Button

4. It will ask to either upload the SSH key or generate the new Key. Make sure you save the SSH key as it is needed to connect later.

5. Next, enter the service name, select the Software Release Version and click Next

6. Next, Select the Compute Shape i.e. how many CPU's and RAM is needed.
Since this is a trial I selected 2 CPU with 15GB RAM, which I feel is more than enough.
Make you select "Both Cloud Storage and Local Storage" Option.
Here in the container details, we need to provide the container service URL, user/password, which we covered in PART 1.
If the container does not exist, you can check Create Cloud Storage Container Check Box

7. Review the configuration details, if everything is OK, click on Create Button.
8. It take about 15- 20 mins to create the Database Instance. Till then you will see the status as In progress.

Once the Service is created, you will see the status as completed. Also the action button is enable for the instance.
Next, we will see how to connect to this Oracle Database Cloud Instance over a public network:
In Order to access the Database Instance over a public network we need to enable the Access Rule.
1. Identify the Public IP address for our Oracle Database Cloud Instance. To do this, just click on the instance and IP will be visible in Details Section
2. Click on Action Button, and Click on Access Rules
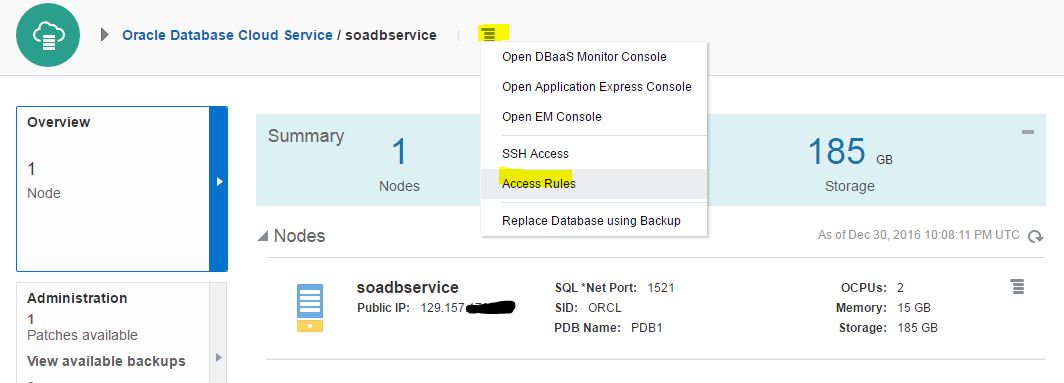
3. Enable the ora_p2_dblistener access rule

4. As the access rule is now enabled, lets connect to the Cloud Database from Local JDeveloper.
Open the JDeveloper, Click on Add Connections under database window
Provide the required details i.e. User/Password that was enter while creating the Database Instance.
Public IP as a Hostname
SID/Port
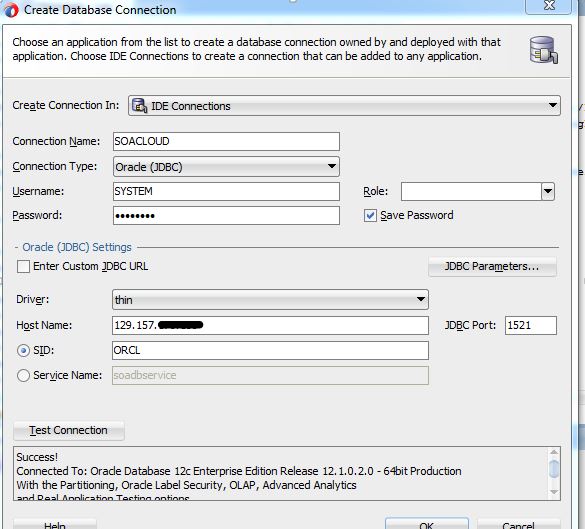
5. If everything is proper, you will see the success message.
Now you can query the database like any other private database in the network.

The Action button provide options to access EM console/DBaas monitor etc, which can be used by the DBA to maintain and manage the DB instances.
Overall, I am pretty impressed with the Oracle Cloud Offering, if you see in this post, I as non-DBA, was able to set up the Database Instance in less than 1 hour with just clicks.
Next in Part 3, We will explore the steps to Configure Oracle SOA Cloud Service Instance using this DB Instance.
Ref:
http://docs.oracle.com/en/database/